Align & Distribute
The Align and Distribute Window can be opened from the menu bar of Unity under "Tools -> Better UI -> Align and Distribute".
Background
In UI development, it is often required to align certain elements to put them in place. This can be achieved by either dragging each control to the side of some other RectTransform to snap it there or by manipulating the coordinates by hand.
Also, certain controls often kind of belong together and should be placed next to each other with the same distance in between. This can be achieved with layout groups or by manipulating the coordinates by hand.
With the Align and Distribute Window, these tasks become a lot easier. You just select the UI elements you want to align or distribute and click a button.
Note: The tool only works for selected objects which have the same parent.
Align

Align Buttons
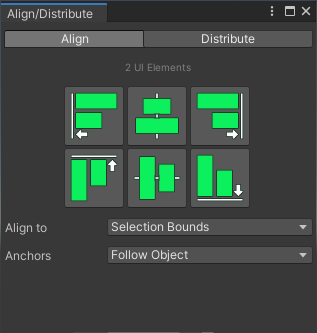
At the center of the window there are six buttons.
The upper three are for aligning horizontally. From left to right:
- Align to the left
- Align to the horizontal center
- Align to the right
The lower three are for aligning vertically. From left to right:
- Align to the top
- Align to the vertical middle
- Align to the bottom
When clicking one of these buttons every object of the selection is aligned to a base line with its respective side (or center).
Align To
The Align to option allows you to specify the base line at which all the selected objects are aligned to. It describes a rectangle. The base line is along the respective side (or horizontal / vertical center) of that rectangle
Selection Bounds: A rectangle where all selected objects just fit in is used as bounds.
Parent: The RectTransform of the parent of all selected objects is used.
First In Hierarchy: The selected object which is placed highest in the hierarchy is used.
Last In Hierarchy: The selected object which is placed lowest in the hierarchy is used.
Biggest Object: The selected object with the largest size in the aligned axis is used.
Smallest Object: The selected object with the smallest size in the aligned axis is used.
Anchors
The anchors option allows you to specify how the min-/max anchors of the selected objects are adjusted when the position of the object updates. The Anchors mode is shared between Align and Distribute.
Snap To Border: Just snaps all anchors to the border in all directions to the object. It is as if you would press the main snap button in the Border tab of the Snap Anchors window.
Follow Object: The anchors move with the object. The object should behave similar as before when changing the parent size / screen resolution.
Stay At Current Position: The anchors are not moved and stay where they have been before moving the object.
Distribute

Distribute Buttons
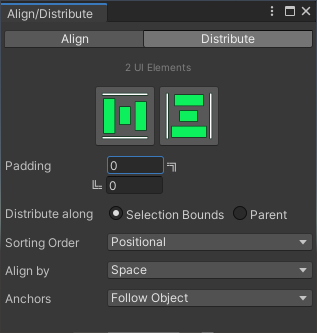
The two buttons at the top allow you to distribute your selected objects horizontally (left button) or vertically (right button).
"Distribute" means that your objects are positioned next to each other within a certain region while having the same distances in between them.
Padding
The region in which the selected objects are distributed in can be modified with the padding. Positive values shrink the region while negative values expand it.
Left / Bottom: The number of pixels from the left (horizontal distribution) or bottom (vertical distribution) of the region.
Right / Top: The number of pixels from the right (horizontal distribution) or top (vertical distribution) of the region.
Distribute Along
This option defines the region in which the objects are distributed.
Selection Bounds: A rectangle where all selected objects just fit in is used.
Parent: The RectTransform of the parent of the selected objects is used.
Sorting Order
The sorting order specifies which of the selected objects is placed where.
Positional: The current position is used to determine where the object is placed. This option is ideal if you are thinking visually: Arrange the objects roughly first by dragging them around then select all objects and press the distribute button to have correct distances.
Hierarchical: The hierarchical order is used to determine where the object is placed. This option is good if you like to work in a structured way. The position in hierarchy describes the positions in the scene. If you want to re-arrange the order, just change the hierarchical order, select all objects and press the distribute button to update the positions.
Reverse Hierarchical: Like hierarchical but in reverse order.
Align By
The distance between objects can be measured in different ways. This option allows to choose the way you need for distributing the selected objects.
If your objects all have the same size and pivot this option doesn’t change anything.
Space: The distance between the objects is used. For horizontal distribution, it is the distance between the right side of an object to the left side of the next object.
Pivot: The distance between the pivots of each object is used.
Left Bottom: The distance between the left sides (horizontal distribution) or bottom sides (vertical distribution) of each object is used.
Center: The distance between the center positions of each object is used.
Right Top: The distance between the right sides (horizontal distribution) or top sides (vertical distribution) of each object is used.
Anchors
Defines how the anchors are moving with the object (see above).