Snap Anchors
The Snap Anchors Window can be opened from the menu bar of Unity under "Tools > Better UI > Snap Anchors".
Background
To really work resolution independently you should never use constant pixel sizes anywhere. Instead, all measurements should be done with "percentages of the screen". To achieve this, you should use Anchors instead of position and size values in pixels.
Anchors describe the top, left, bottom and right anchor of an object in relative coordinates (relative to its parent). UGUI comes with an anchoring system which allows exactly this.
However, the predefined anchoring settings often doesn't fit the requirements, so you must setup the anchors by hand which can be annoying.
The Snap Anchors window allows you to adjust the anchors in the most often used way by just clicking a button.
Workflow
Add an UI element to a canvas in while working with the optimized resolution. Move and resize the object as you want (but avoid it to scale or rotate it). When you are ready click the big button of the Snap Anchors Window which will change the anchors of the object but keeps its position and size.
Change the resolution to see how the objects position and size is affected.
You can also select several Objects and apply the anchoring to all of them.
Note that only anchors of selected objects will be adjusted. Their children keep their previous anchoring as long as they are not selected as well.

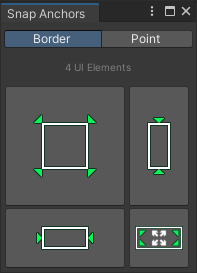
It is also possible to snap only the horizontal Anchors (button on bottom) or the vertical anchors (button on left) and keep the other axis as it were before.
Keep in mind that the anchors are always relative to their parents. If the parent doesn't change its size, the anchors will be irrelevant. So, make sure that the parents are anchored correctly as well.
Restriction: For some objects anchoring doesn't work as expected. This is the case for objects where the anchors are changed inside the code. Such an object is the Handle of a Slider for example.
Modes
There are two modes how to snap the anchors which can be selected at the top of the window (Border, Point).
The Border mode is the most important and probably used more than 90% in comparison to Point.
Border
In Border mode, the Anchors are snapped to the bounding of an object. This eliminates any pixel- distances and converts them to percentages relative to the parent. If the parent changes its size (e.g. due to a different resolution), the anchored object will change its position and size in relation to that change.
The big button snaps all borders.
The button left to the big button snaps the vertical anchors to the borders.
The button below the big button snaps the horizontal anchors to the borders.
The small button at the lower right expands the Rect Transform to the size of its parent and sets the anchors to the borders.
Point
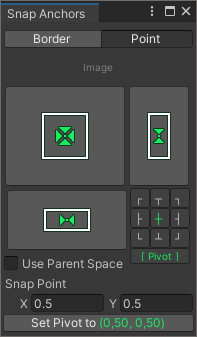
The Point mode adds some extra options to the window. It sets the anchors to a relative point of the selected object or its parent (if "Point in Parent Space" is selected). In the lower right corner between the buttons there are some presets you can click for the most used custom point options (upper / center / lower & left / middle / right). If "[ Pivot ]" is selected, the point is set to the pivot point of the object (only available if only one object is selected).
The Point Mode doesn't eliminate pixel distances. It is most likely used to only set the horizontal or vertical anchors and set the other axis in Border mode.
There is also a button "Set Pivot to (X, Y)" which allows to set the pivot point of the selected object(s) with a single click.
